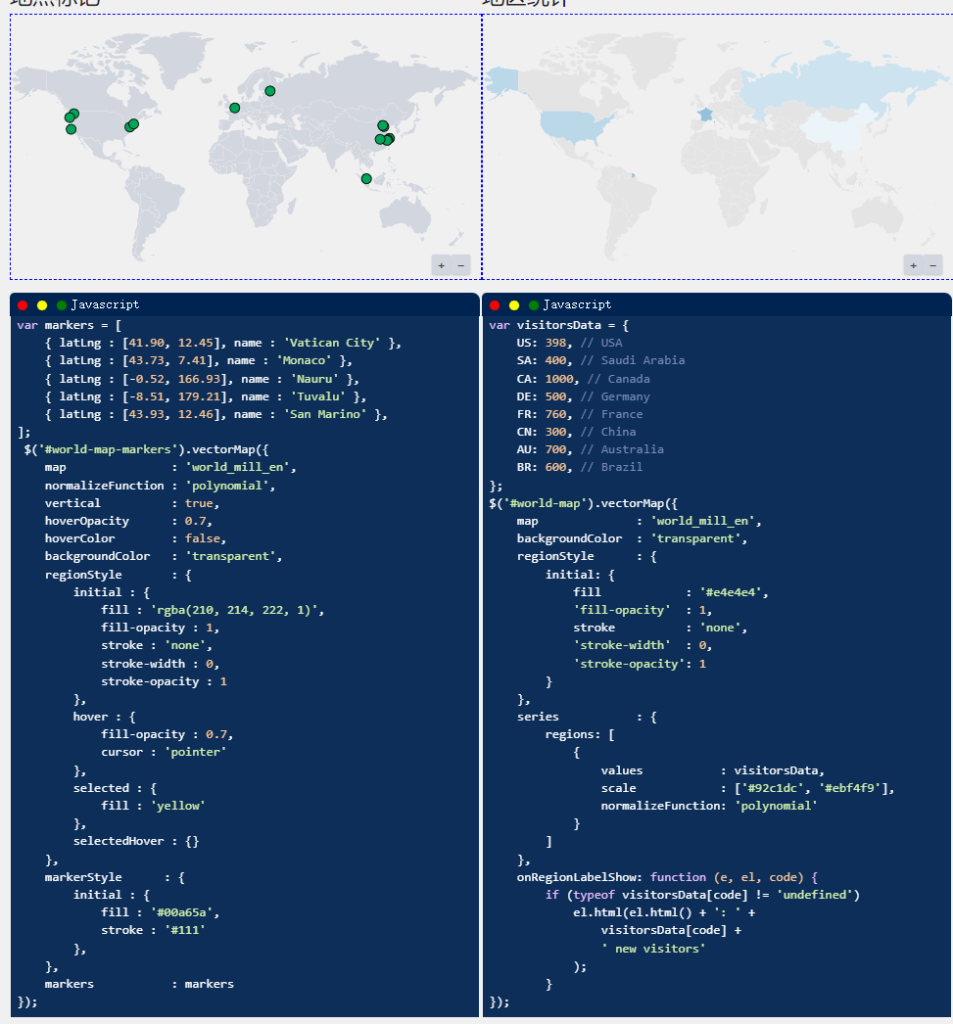
Vue-CLI中配置postcss-pxtorem自动将px转换为rem

1.安装postcss-pxtorem

$ npm install postcss postcss-pxtorem --save-dev

2.添加配置项package.json

{
  "name": "myweb",
  "version": "0.1.0",
  "private": true,
  //...
  "postcss": {
    "plugins": {
      "autoprefixer": {},
      "postcss-pxtorem": {
        "rootValue": 37.5,
        "propList": [
          "*"
        ]
      }
    }
  },
 //...
}

3.创建src/utils/rem.js

window.onresize = function () {
    getSize();
};
function getSize  () {
    var deviceSize = document.documentElement.clientWidth;
    console.log("设备宽度:", deviceSize);
    var fontSize = (deviceSize / 20);  
    // 这里的 20 * rootValue = 你的设计稿宽度px
    // 例如我的设计稿宽750px : 20 *  rootValue(37.5) = 750px
    console.log("字体大小:",fontSize +"px");
    document.documentElement.style.fontSize = fontSize +"px";
}
getSize(); // 这里必须在页面打开时先执行一次

4.main.js 导入rem.js

import "./utils/rem.js"

5.总结

postcss-pxtorem只是一个方便开发的插件,你可以在源码中直接写设计稿单位xp。在调试、开发打包时自动转换为rem。在Vue-Cli中项目中默认自带安装了Postcss,只需要配置和动态修改DOM根元素fontSize。Vue-Cli会帮你自动完成.

Posted in js, Vue | Leave a comment

Layui V2.6.3 Table

<script src="../lib/layui-v2.6.3/layui.js" charset="utf-8"></script>
<script>
    layui.use(['form', 'table'], function () {
        var $ = layui.jquery,
        var form = layui.form,
        var table = layui.table;
        //渲染方法
        table.render(options);
        //重载方法
        table.reload(id, options) 
    }
    //若为静态渲染,则 lay-data 里面的内容即为基础参数项          
	<table lay-data="{url:''}"> … </table>
</script>
参数类型说明默认 / 用法
参数类型说明默认
elemString/DOM指定原始 table 容器 
colsArray设置表头。值是一个二维数组 
urlString异步数据接口 
dataArray直接赋值数据.既适用于只展示一页数据.注:该参数与 url 参数只能二选一 
idString设定容器唯一 id 
toolbarString/DOM/Boolean开启表格头部工具栏区域,该参数支持四种类型值: 
defaultToolbarArray该参数可自由配置头部工具栏右侧的图标按钮 
widthNumber设定容器宽度 
heightNumber/String设定容器高度 
cellMinWidthNumber全局定义所有常规单元格的最小宽度 
lineStyleString用于定义表格的多行样式,如每行的高度等。该参数一旦设置lineStyle: ‘height: 95px;’
classNameString用于给表格主容器追加 css 类名 
cssString用于给当前表格主容器直接设定 css 样式 
escapeBoolean是否开启对内容的编码(转义 html)true
totalRowBoolean/String是否开启合计行区域false
pageBoolean/Object开启分页。支持传入一个对象false
pagebarString/DOM用于开启分页区域的自定义模板 
limitNumber每页显示的条数 
limitsArray每页条数的选择项。 
loadingBoolean是否显示加载条 
scrollPosString用于设定重载数据或切换分页时的滚动条的位置状态 
editTriggerString是用于设定单元格编辑的事件触发方式,如双击:dblclick 
titleString定义 table 的大标题 
textObject自定义文本,如空数据时的异常提示等。 
autoSortBoolean默认 true,即直接由 table 组件在前端自动处理排序。 
initSortObject初始排序状态。用于在数据表格渲染完毕时,默认按某个字段排序。 
skin 设定表格各种外观、尺寸等 
beforeFunction数据拉取之前的回调 
doneFunction数据渲染完毕的回调 
errorFunction数据请求失败的回调 
fieldString设定字段名 
titleString设定标题名称 
widthNumberr/String设定列宽, 
minWidthNumber局部定义当前常规单元格的最小宽度 
typeString设定列类型。可选值有:
normal(常规列,无需设定),
checkbox(复选框列),
radio(单选框列),
numbers(序号列),
space(空列)
 
LAY_CHECKEDBoolean是否全选状态false
fixedString固定列,可选值有:
left(固定在左),
right(固定在右)
 
hideBoolean是否初始隐藏列false
escapeBoolean当前列是否开启编码转义 htmltrue
totalRowBoolean/String是否开启该列的自动合计功能true
sortBoolean是否允许排序false
unresizeBoolean是否禁用拖拽列宽false
editString单元格开启编辑的方式(默认不开启),
支持的值有:text textarea
 
eventString自定义单元格点击事件名 
styleString自定义单元格样式 
alignString单元格排列方式。
可选值有:leftcenterright
left
colspanNumber单元格所占列数。一般用于多级表头 
rowspanNumber单元格所占行数 
templetString/Function自定义列模板 
exportTempletString/Function专用于表格导出时的内容输出 
toolbarString/Function绑定行工具模板 
Posted in 未分类 | Leave a comment

V2Ray 安装配置教程

#!/bin/bash
#查看系统时间
date -R

#修改时取
tzselect

#更新系统
sudo apt update

#安装curl
sudo apt install curl

#下载一键安装搅拌
sudo curl -O https://raw.githubusercontent.com/
v2fly/fhs-install-v2ray/master/install-release.sh

#执行安装脚本
sudo bash install-release.sh

#运行
sudo systemctl start v2ray
sudo systemctl status v2ray

#停止
sudo systemctl stop v2ray

#设置开机自启动 V2Ray:
sudo systemctl enable v2ray

#配置文件
sudo nano /usr/local/etc/v2ray/config.json

#删除安装包
sudo apt purge curl unzip

#安装TLS证书
#安装certbot
sudo snap install --classic certbot
#设置环境变量
sudo ln -s /snap/bin/certbot /usr/bin/certbot
#自动获取证书
sudo certbot certonly --standalone 	#Certbot启动一个临时服务器验证
sudo certbot certonly --webroot		#已经在使用端口80端口根目录验证

# run
sudo certbot certonly --standalone

#--------------------------------------------------------------
#Successfully received certificate.
#Certificate is saved at: /etc/letsencrypt/live/www.xxx.cn/
#    fullchain.pem
#Key is saved at:         /etc/letsencrypt/live/www.xxx.cn/
#    privkey.pem
#This certificate expires on 2022-11-28.
#These files will be updated when the certificate renews.
#Certbot has set up a scheduled task to automatically renew this 
#certificate in the background.
#We were unable to subscribe you the EFF mailing list because your e-mail 
# address appears to be invalid. You can try again later by visiting 
#https://act.eff.org.
#--------------------------------------------------------------

#自动续订
sudo certbot renew --dry-run

#创建 V2Ray 专用的证书文档目录:
sudo install -d -o nobody -g nogroup /etc/ssl/v2ray/

#将证书文档以指定权限部署到指定路径:
sudo install -m 644 -o nobody -g nogroup 
    /etc/letsencrypt/live/www.timethief.cn/fullchain.pem 
    -t /etc/ssl/v2ray/
sudo install -m 600 -o nobody -g nogroup 
    /etc/letsencrypt/live/www.timethief.cn/privkey.pem 
    -t /etc/ssl/v2ray/

#为在后续 renew 中自动重新部署,需要一个脚本
#vim /etc/letsencrypt/renewal-hooks/deploy/v2ray.sh
#!/bin/bash
V2RAY_DOMAIN='www.xxx.cn'
if [[ "$RENEWED_LINEAGE" == "/etc/letsencrypt/live/$V2RAY_DOMAIN" ]]; then
    install -m 644 -o nobody -g nogroup "/etc/letsencrypt/
        live/$V2RAY_DOMAIN/fullchain.pem" -t /etc/ssl/v2ray/
    install -m 600 -o nobody -g nogroup "/etc/letsencrypt/
        live/$V2RAY_DOMAIN/privkey.pem" -t /etc/ssl/v2ray/
    sleep "$((RANDOM % 2048))"
    systemctl restart v2ray.service
fi

run

{
    "log": {
        "access": "/var/log/v2ray/access.log",
        "error": "/var/log/v2ray/error.log",
        "loglevel": "warning"
    },
    "inbound": {
        "port": 443,
        "protocol": "vmess",
        "listen": "127.0.0.1",
	"settings": {
            "clients": [
                {
                    "id": "xxxxx",
                    "level": 1,
                    "alterId": 100
                }
            ]
        },
        "streamSettings": {
            "network": "kcp",
            "security": "tls",
            "tlsSettings": {
                "serverName": "www.xxxxx.cn",
                "certificates": [
                    {
                        "certificateFile": "/etc/ssl/v2ray/fullchain.pem",
                        "keyFile": "/etc/ssl/v2ray/privkey.pem"
                    }
                ]
            }
        }
    },
    "outbound": {
        "protocol": "freedom",
        "settings": {}
    },
    "inboundDetour": [],
    "outboundDetour": [
        {
            "protocol": "blackhole",
            "settings": {},
            "tag": "blocked"
        }
    ],
    "routing": {
        "strategy": "rules",
        "settings": {
            "rules": [
                {
                    "type": "field",
                    "ip": [
                        "0.0.0.0/8",
                        "10.0.0.0/8",
                        "100.64.0.0/10",
                        "127.0.0.0/8",
                        "169.254.0.0/16",
                        "172.16.0.0/12",
                        "192.0.0.0/24",
                        "192.0.2.0/24",
                        "192.168.0.0/16",
                        "198.18.0.0/15",
                        "198.51.100.0/24",
                        "203.0.113.0/24",
                        "::1/128",
                        "fc00::/7",
                        "fe80::/10"
                    ],
                    "outboundTag": "blocked"
                }
            ]
        }
    }
}

Posted in Linux, shell | Leave a comment

js中new Date().format()方法不可用问题

<!DOCTYPE html>
<html lang="en">
<head>
    <meta charset="UTF-8">
    <title>Title</title>
</head>
<body>

</body>
</html>

<script type="javascript">
    Date.prototype.format = function(format){
        if((format = "" || format == undefined)){
            format ="yyyy-mm-dd h:m:s"
        }
        let conf =['yyyy','mm', 'dd','h','m','s','S'];
        let arr = {
            'yyyy':this.getFullYear(),
            'mm':this.getMonth() +1,
            'dd':this.getDate(),
            'h':this.getHours(),
            'm':this.getMinutes(),
            's':this.getSeconds(),
            'S':this.getMilliseconds(),
        };
        conf.forEach(function(item){
            format= format.replace(item,arr[item])
        });
        return format;
    };
    // 添加到Vue原型上
    Vue.prototype.$date = function (value) {
        return new Date();
    };
    // 使用
    new Vue({
        el: '#app',
        data:function(){
            return {
                time:46545
            }
        }
        computed:{
            time_str(){
                return   this.$date(this.time).format();
            }
        }
    });
</script>
Posted in js, Vue | Leave a comment

2022年前端CSS 框架排名

### Bootstarp
- 简单 强悍 响应式布局 移动端优先
- https://getbootstarp.com
- Star: 15.9w
### Ant Design
- 企业级应用UI 高质量的React组件(蚂蚁金服)
- https://ant.design/index-cn
- Star: 8.14w
### Material-UI
- React 组件
- https://material-ui.com/zh/
- Star:8.04w
### Tailwind CSS
- 低级别的CSS框架 简化构建 自定义组件
- https://tailwindcss.com
- Star: 5.96w
### Element
- 饿了么
- https://element.eleme.cn/#/zh_CN
- Star: 5.25w
### Materialize
- 响应式
- https://materializecss.com
- Star: 3.87w
### WeUI
- 微信
- https://weui.io
- Star: 2.65w
### Layui
 - 经典模块化前端框架 弹出层非常友好
 - https://wwwlayui.com
 - Star: 2.64w
### iView
- 基与vue.js组件库
- https://iview.talkingdata.com
- Star: 2.4w
### Gentelella Admin
- 基与Bootstarp 4
- https://colorlib.com/polygon/gentelella/index.html
- Star: 2.06w
### Vant
- 移动端组件库
- https://vant-contrib.gitee.io/vant/#/zh-CN
- Star: 2.0w
### NES.CSS
- 模仿 掌机的css库
- https://nostalgic-css.github.io/NES.css/#
- Star: 1.88w
### Vant
- 移动端组件库
- https://vant-contrib.gitee.io/vant/#/zh-CN
- Star: 2.0w
### Cube UI
- 滴滴
- https://didi.github.io/cube-ui/
- Star: 9k
 
Posted in css | Leave a comment

wordpress 站点统计jMaps插件(测试版)

jMaps是一个用于统计站点访问量的插件,通过ipinfo显示访问者的物理地址。

主要功能:

  • 记录访问者ip
  • 通过ip解析访问者的物理地址
  • 内置ace代码编辑器
  • 内建mac风格代码显示
  • 修复中国地区头像无法加载问题
  • 通过wordpress内置stmp实现,邮件的STMP服务

目前是测试版,如何出现问题请留言….

附件:点击下载

Posted in wordpress | Leave a comment

ubuntu18.04 sudo apt-get install E: 无法定位软件包

#!/bin/bash sh
sudo add-apt-repository ppa:ondrej/php
sudo apt-get update
sudo apt-get install php7.4-dom
Posted in shell | Leave a comment

Js当前页面截图,并保存到本地

#!/bin/bash sh
//下载包
npm install --save html2canvas
<!DOCTYPE html>
<html>
    <header></header>
    <body>
        <div style="width: 300px;height:500px;background-color: red;" ></div>
    </body>
    <script type="text/javascript" src="./dist/html2canvas.js"></script>
    <script type="text/javascript">
        function screenshot(Element,filename){
            //获取当前页面canas
            html2canvas(Element,{useCORS:true}).then(function (canvas) {
                //获取图片数据
                var imgData = canvas.toDataURL();
                //保存图片
                var saveFile = function(data, filename){
                    var save_link = document.createElementNS(
                      'http://www.w3.org/1999/xhtml', 'a');
                    save_link.href = data;
                    save_link.download = filename;
                    //创建事件
                    var event = document.createEvent('MouseEvents');
                    event.initMouseEvent(
                      'click', true, false, window, 
                       0, 0, 0, 0, 0, false, false,
                       false, false, 0, null
                     );
                    save_link.dispatchEvent(event);
                };
               //下载文件
                saveFile(imgData,filename);
            })
        }
        screenshot(document.body,"001.jpg");
    </script>
</html>

options参数

参数名称类型默认值描述
allowTaintbooleanfalse允许跨域
useCORSbooleanfalse貌似与跨域有关,但和allowTaint不能共存
proxystringundefined代理地址
taintTestbooleantrue是否在渲染前测试图片
timeoutnumber0图片加载延迟,默认延迟为0,单位毫秒
loggingbooleanfalse在Console中输出信息
widthnumbernullcanvas的宽度设定
heightnumbernullcanvas的高度设定
backgroundstring#fffcanvas的背景颜色(未指定则为透明)
letterRenderingbooleanfalse在设置了字间距的时候有用
//引入
<script type="text/javascript" src="./dist/html2canvas.js"></script>
//写法1
html2canvas($(".box"),{
    allowTaint:true,
    taintTest:false,
    width:"100px",
    height:"100px",
    onrendered:function(canvas){
    	var dataUrl = canvas.toDataURL("image/png",1.0);
		var newImg = document.createElement("img");
        newImg.src = dataUrl;
        $(".box").empty().append(newImg);
        newImg.style.width = "100%";
    }
});

//写法2 下载到本地
function screenshot(Element,filename){
    //获取当前页面canas
    html2canvas(Element,{useCORS:true}).then(function (canvas) {
    	//获取图片数据
        var imgData = canvas.toDataURL();
        //下载图片
        var saveFile = function(data, filename){
        	var save_link = document.createElementNS(
                'http://www.w3.org/1999/xhtml', 'a');
        	save_link.href = data;
        	save_link.download = filename;
        	//创建事件
        	var event = document.createEvent('MouseEvents');
        	event.initMouseEvent('click', true, false,window, 
        		0, 0, 0, 0, 0, false, false, false, false, 0, null);
        	save_link.dispatchEvent(event);
        };
				saveFile(imgData,filename);
    })
}
//调用
screenshot(document.body,"001.png");
Posted in js | Leave a comment

appserv 的php多版本下载工具

#!/usr/bin/env php
<?php

/**
 * AppServ的php下载工具
 * 需要安装wget for windowns 工具 网站
 * http://www.gnu.org/software/wget/
 * 为了避免每次重新爬去文件列表,已定义$config中
 */


//已获取的文件列表,详见附件
$config = [];
//官网
$host ='https://windows.php.net/downloads/releases/archives/';
//保存路径
$save_path ="E:/AppServ/download/";
//powershell
$powershell_path ="C:/Windows/System32/WindowsPowerShell/v1.0/powershell.exe";

// +----------------------------------------------------------------------
// / 程序执行流程
// +----------------------------------------------------------------------
echo "\n  AppServ的php下载工具 v1.0\n\n";
echo "\n请输入版本号: ";
$search_str = strtolower(trim(fgets(STDIN)));
$res =[];
$i=0;
if(!empty($search_str)){
    foreach($config as $filename){
        if( strpos($filename,$search_str) !== false){
            $res[] = $filename;
            echo "[$i]    ".$filename."\n";
            $i++;
        }
    }
    if(!empty($res)){
        echo "\n请请输入你想要下载文件序号: ";
        $file_number = strtolower(trim(fgets(STDIN)));
        if(isset($file_number) and !empty($file_number) and isset($res[$file_number])){
            echo "\n开始下载".$res[$file_number];
            download($res[$file_number]);
            echo "下载完毕\n";
        }
    }else{
        echo "\n没有查询到文件";
        die();
    }
   
}

/**
 * 获取版本号
 */
function get_version($file_name){
    preg_match_all("/(([0-9]|([1-9]([0-9]*))){1,2}.){2}([0-9]|([1-9]([0-9]*))){1,2}/",$file_name,$version);
    if(isset($version) and empty($version)){
        return $version[0][0];
    }
}
/**
 * 下载文件
 */
function download($file,$path ="E:/AppServ/download/"){
    global $host,$save_path,$powershell_path;
    shell_exec("$powershell_path clear");
    shell_exec("$powershell_path wget  ".$host."/".$file." -o ".$path.$file);
}
/**
 * 从html中获取官网文件列表
 */
function get_files($str){
    // $str =file_get_contents("a.txt");
    preg_match_all("/href=\"([^\"]+)\"/ims",$str,$link);
    $files =[];
     foreach($link[0] as $name){
        $name =str_replace("\"",'',$name);
        $path =str_replace("href=/",'',$name);
         if(strpos($path,"downloads/releases/archives/php-") !==false){
            $arr=explode("/",$path);
            $file_name = end($arr);
            $files[] =$file_name;
            $file_name ='';
         }
     }
    return  $files;
}
Posted in 未分类 | Leave a comment

appserv本地开发环境,经常需要添加多站点,手动操作很麻烦,于是创建控制台操作

#!/usr/bin/env php
<?php
//apache多站点配置
$apache_config ="E:/AppServ/Apache24/conf/extra/httpd-vhosts.conf";
//本地从定向
$host_config ="C:/Windows/System32/drivers/etc/hosts";
//appserv根目录
$www ="E:/AppServ/www";
//apache 重启
$apache_Restart ="E:\AppServ\Apache24\bin\httpd.exe -k restart -n Apache24";
//域名
$domain_suffix ='myweb.com';

//apache多站点模板
$str_apache = <<<EOD
<VirtualHost *:80>
    ServerAdmin [email protected]
    DocumentRoot "E:/AppServ/www/{dirname}"
    ServerName {domain_suffix}
    ServerAlias {hostname}.{domain_suffix}
    ErrorLog "logs/dummy-host2.example.com-error.log"
    CustomLog "logs/dummy-host2.example.com-access.log" common
</VirtualHost>
EOD;
//主机模板
$str_host =<<<EOD
127.0.0.1   {hostname}.{domain_suffix}
EOD;


// +----------------------------------------------------------------------
// / 程序执行流程
// +----------------------------------------------------------------------
echo "\n  AppServ新建项目工具 v1.0\n\n";
echo "\n请选择模式 [0-1, or \"q\" to 退出] ";
echo "\n  0:新增模式";
echo "\n  1:删除模式";
echo "\n  :";
$answer = trim(fgets(STDIN));
if($answer ==0){
    echo "\n请输入项目名称:";
    $dirname = strtolower(trim(fgets(STDIN)));
    $project_dir =$www .'/'.$dirname;
    echo "\n请输入主机名称:";
    $hostname = strtolower(trim(fgets(STDIN)));
    echo "\n请输入运行目录名称:";
    $runDir = strtolower(trim(fgets(STDIN)));
    if(!is_dir($project_dir)){
        mkdir($project_dir,0777);
    }
    if(!empty($runDir)){
        $dirname .='/'.$runDir;
        echo $project_dir.'/'.$runDir;
        if(!is_dir($project_dir.'/'.$runDir)){
            mkdir($project_dir.'/'.$runDir,0777);
        }
        
    }


    if(is_config($apache_config,
        "ServerAlias $hostname'.'$domain_suffix") === false){
        $config = config_replace($str_apache,[
            'dirname'=>$dirname,
            'domain_suffix'=>$domain_suffix,
            'hostname'=>$hostname,
        ]);
        file_add($apache_config, $config);
        echo "\n创建apache站点成功";
        file_add($host_config,"\n".config_replace($str_host,['domain_suffix'=>$domain_suffix,'hostname'=>$hostname]));
        echo "\n创建本地重定向成功";
        exec($apache_Restart);
        echo "\napache重启成功";
        die();
    }
    

}elseif($answer ==1){
    echo "\n请输入主机名称:";
    $hostname = strtolower(trim(fgets(STDIN)));
    $domain =$hostname.".".$domain_suffix ;

    if(is_config($apache_config,$domain)=== false){
        echo "\n没有找到站点";
    }else{
        $config = file_get_contents($apache_config );
        preg_match_all("/<\VirtualHost \*:80>[^<]*<\/\VirtualHost>/",$config ,$hosts);
        foreach($hosts[0] as $str){
            $s = get_config($str);
            if( isset($s['ServerAlias']) and  $s['ServerAlias'] ==$domain){
                //更新apache配置
                file_del($apache_config,$str);
                echo "\n删除apache站点成功";
                //更新重定向配置
                file_del($host_config,"\n127.0.0.1   ".$domain);
                echo "\n删除本地重定向成功";
                die();
                
            }
        }
    
    }
    
    
}else{
    echo "\n退出初始化.\n";
    exit(0);
}


// +----------------------------------------------------------------------
// / 自定义函数
// +----------------------------------------------------------------------
//新增配置
function file_add($file,$config){

    file_put_contents($file,$config,FILE_APPEND);

}

//删除配置文件
function file_del($file,$config){
    $str = file_get_contents($file);
    $str = str_replace($config,'',$str);
    file_put_contents($file,$str);
}

//判断配置是否存在
function is_config($file,$config){
    $str = file_get_contents($file);
    return strpos($str,$config);
}

//字符串替换
function config_replace($template,$data=[]){
    foreach($data as $key=>$value){
        $template = str_replace("{".$key."}",$value,$template);   
    }
    return $template;
}
//获取站点配置
function get_config($str){

    if(strpos($str,"ServerAlias")){
        $str =str_replace("\r",'',$str);
        $str =str_replace("\"",'',$str);
        $data =  explode(chr(10),$str);
        $arr =[];
        for($i=1;$i<=4;$i++){
            $r= array_filter(explode(' ', $data[$i]));
            $arr[current( $r)]=next($r);
        }
        return $arr;
   }


}
Posted in 未分类 | Leave a comment